Mehndi, also known as henna, is a cherished art form that adorns the hands and feet with intricate patterns, especially during festive occasions and celebrations. For beginners, starting with easy front hand simple mehndi designs can build confidence and skill.
Understanding Mehndi Designs
Mehndi designs vary across cultures, with popular styles including Arabic, Indian, and Moroccan patterns. For novices, focusing on simple motifs like flowers, leaves, and geometric shapes is advisable.
Tips for Beginners
- Practice Basic Shapes: Start with simple elements such as dots, lines, and circles to build a foundation.
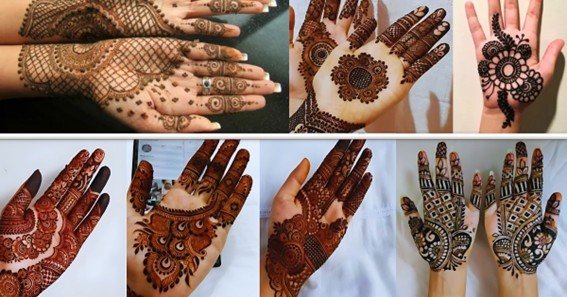
- Use Reference Images: Refer to beginner-friendly designs to guide your practice.
- Steady Your Hand: Maintain a steady hand by resting your elbow on a flat surface while applying mehndi.
- Start Small: Begin with small designs and gradually progress to more intricate patterns as your confidence grows.
Popular Simple Front Hand Mehndi Designs
Here are some beginner-friendly designs to consider:
Floral Patterns
Incorporate basic flower motifs with petals and leaves for an elegant look.
Geometric Shapes
Utilize triangles, squares, and diamonds to create modern and straightforward designs.
Mandala Designs
Draw concentric circles with repetitive patterns for a traditional yet simple appearance.
Leafy Vines
Create trailing vine patterns with leaves to add a touch of nature-inspired beauty.
Minimalist Dots and Lines
Combine dots and lines to form abstract and contemporary designs suitable for any occasion.
Step-by-Step Guide to a Simple Floral Mehndi Design
- Prepare the Henna Cone: Ensure the henna paste is smooth and the cone tip is fine for precise application.
- Draw the Central Flower: Start in the center of the palm by drawing a small circle. Add petals around the circle to form a flower.
- Add Leaves and Vines: Extend lines from the flower and add leaf shapes to create vines radiating outward.
- Decorate the Fingers: Apply simple patterns on each finger, such as small flowers, dots, or lines, to complement the central design.
- Let It Dry: Allow the mehndi to dry completely, then gently scrape off the dried paste. Avoid washing with water immediately to ensure a darker stain.
Additional Resources
For visual learners, tutorial videos can be incredibly helpful.
Here’s a recommended video that demonstrates an easy front hand mehndi design:
FAQ
- How long does mehndi take to dry?
- Typically, mehndi takes 30 minutes to an hour to dry. For a darker stain, it’s advisable to keep it on for several hours or overnight.
- How can I make my mehndi stain darker?
- Applying a mixture of lemon juice and sugar to the drying mehndi can enhance the stain. Additionally, avoiding water contact for at least 12 hours after removal can help.
- Is it safe to use store-bought henna cones?
- While many store-bought cones are safe, it’s essential to check for natural ingredients and avoid those containing harmful chemicals like PPD.
- Can I practice mehndi on paper before applying it to my skin?
- Yes, practicing on paper can help you gain control and precision before applying designs to your skin.
- How long does a mehndi design last on the skin?
- Mehndi stains typically last 1 to 2 weeks, depending on skin type and aftercare.